I'm an international teacher in Abu Dhabi. I am seeking new ways to support teachers. I am the face behind the Laney Lee science resources that you love!
Let me be real: I’ve taught middle school science in classrooms where chaos was the norm: behavior issues, no designated lab space, and not nearly enough time. The idea of pulling off a lab felt exhausting.
That’s exactly why I started creating science labs that are simple, engaging, and realistic for everyday classrooms.
This mineral identification lab is a total win. It hits so many essential Earth science concepts: physical properties of minerals, observation skills, and classification. Students get hands-on with real mineral samples and test for color, streak, luster, hardness, and cleavage or fracture.
Not only does this lab build critical science skills like observation and analysis, but it also introduces some of the trickiest vocabulary in the unit: luster, streak, cleavage, fracture, and hardness. And it aligns beautifully with NGSS standards like MS-ESS2-1, with clear connections to structure and function and patterns in mineral properties.
And best of all? It’s teacher-friendly. Minimal prep. Reusable kits. And totally doable in a single class period.
If you’re nervous about managing labs, I’ve got your back. I wrote this with you in mind. Keep reading to get all my tips and tricks for making this mineral identification lab a smooth, exciting day for you and your students.
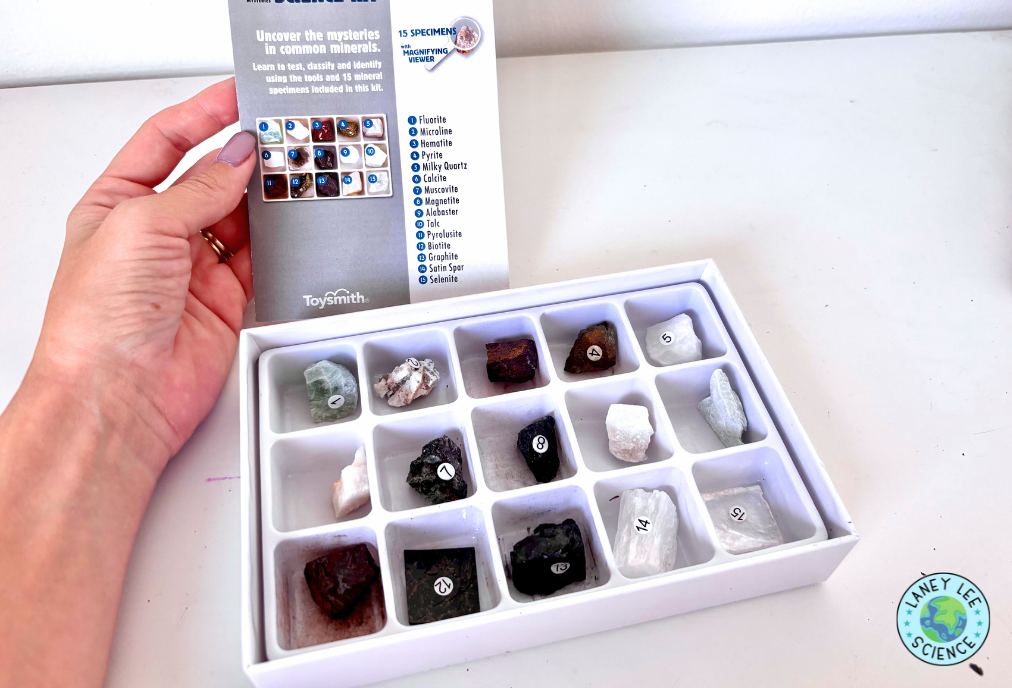
You can find everything in a basic mineral kit like this one on Amazon. Each group will need:
6–10 labeled mineral samples
Streak plate (unglazed porcelain tile)
Glass plate or nail (for hardness testing)
Copper penny and fingernail (for Mohs comparison)
Magnifying glass
Nail or paperclip
Optional: vinegar dropper (for bonus fizz test with calcite)
Mineral identification chart (I’ve linked several great ones in the product PDF.)
Student data worksheet
You can prep this ahead of time by sorting kits into bins or bags for each group.
procedure summary
Students will rotate through simple tests to observe and record the properties of minerals. Here’s a quick breakdown of the steps:
Color – Observe and record the visible color.
Streak – Rub the mineral on the streak plate and record the color of the streak.
Luster – Use a light source to determine if the mineral is metallic, glassy, dull, etc.
Hardness – Test the mineral’s ability to scratch or be scratched by items of known hardness (fingernail, penny, glass, nail).
Cleavage/Fracture – Observe how the mineral breaks: smooth flat surfaces (cleavage) or jagged irregular breaks (fracture).
Identify – Use the data to compare against a mineral chart and figure out each sample.
It’s investigative, tactile, and just the right amount of challenge for middle schoolers.
Laney's Tips For Success
Label the samples! Use small stickers or marker dots to number the minerals in each kit so students can easily record results. I really love that the mineral kit I linked on Amazon above already had this done, plus a key so that you actually know what’s what. (Don’t give the students the key, though!)
Pre-teach vocabulary. Do a quick station walk-through or vocab sketch note activity before the lab so kids know what luster and cleavage actually look like. I’ve provided some helpful guides in my PDF.
Final Thoughts
The mineral identification lab is one of those perfect middle school moments. Real science, real tools, real thinking. It’s hands-on, high-interest, and totally manageable, even in a busy classroom with limited resources.
When students physically test and observe minerals, they’re not just memorizing vocabulary, they’re learning how scientists classify the natural world. They’re building observation skills, drawing conclusions, and engaging with Earth science in a way that sticks.
So if you’ve ever hesitated to try this lab because you thought it might be too much? Trust me, it’s doable. It’s fun. And it’s one of the best ways to bring Earth science to life.